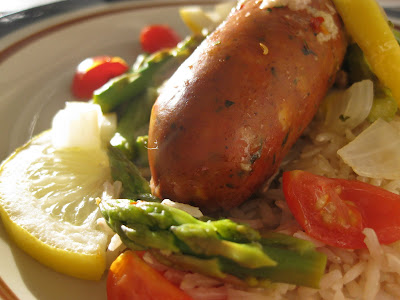
Here is our first "French" recipe, although with the sausage it is really more American-French fusion food. In France this sort of dish is traditionally made with fish, like a white sea bass type fish or salmon (not tuna). Here though my mom and I like to make it with sausage, especially since if we go to the right store we can buy a variety of sausage and then make different flavors. Lien, I hope you can get sausage!
4 sausages (like the size of hot dogs, not breakfast ones)
1/2 onion diced
1 lemon sliced
handful of asparagus/greenbeens (whatever veggie you would like to chop and put in with it basically)
4 tablespoons of olive oil
1 tablespoon of minced garlic, or 4 cloves of garlic chopped
1/2 teaspoon of chili flakes
optional:
4 cherry tomatoes cut into quarters
or conversely 16 pieces of sun-dried tomatoes (I didn't have any this time so I used real tomatoes)
2 teaspoons of harissa (did not include in this)
1 preserved lemon (can be substituted for the real lemon)
First preheat the oven to 400 degrees Fahrenheit
Then take out some aluminum foil to make your papillotes. I know papillotes implies paper, but parchment paper just gets too frustrating to fold for this so I always use aluminum foil. So I usually take a chunk of aluminum foil about 10 inches wide. Then you place the sausage in the middle and raise the foil up on all the sizes, so that way your olive oil wont come leaking out. Like this:
Then chop your veggies.
For those of you who don't know here is a peeled onion:
And here are my chopped veggies.
Diced onions, since I had no picture to accompany my very long explanation in the first post:
Then you add your olive oil to the sausage packets. Then all your veggies and garlic and whatnot so it looks like this:
Then wrap it up on top, by curling up the foil so that way the air isn't rushing out of the packets. This way the steam will stay in as well as all the flavors making one hell of a good concoction.
Then put it in the oven for about 15-20 minutes if it is a cooked sausage (as in it comes in the package precooked), or 25-30 minutes if it is an uncooked sausage (this type of sausage will look a lot paler than it's cooked counterparts. I used cook sausages so you can always use that for reference.
While they are in the oven I usually make couscous to go under the done sausage. This time I didn't have any couscous so I just make rice which works just as well. Lien, you have a rice cooker, so I am going to assume you know how to use it. If not...well I can't help you because I don't either. But I can cook rice on the stove!
Once the sausage is finished (you can cut it open with a knife to tell [the aluminum shouldn't be hot to touch when you do this] and then if it is still pink and slightly bloody in the inside if it is uncooked or cold if it is a precooked sausage it isn't ready), then put some rice or couscous on a plate, take your sausage papillote and pour the contents out on top. And then you have a wonderful meal that looks like this:
I hope you guys like it.
Tuesday, August 25, 2009
Monday, August 24, 2009
Raspberry Marbled Cheesecake
Hey everybody! Welcome to our blog! We celebrated my grandma's 79th birthday on Sunday. Lionel wanted cheesecake, so we decided to bake one and bring it to the birthday party. I decided to make a raspberry swirled cheesecake. Here goes, my very first post! Lien, I'll try to make it detailed for you if you ever want to try this out.
Crust:
1/2 cup melted butter
2 cups graham cracker crust
3 tablespoons sugar
Cheesecake:
16 ounces softened cream cheese
3/4 cup sugar
1 teaspoon vanilla
2 eggs
10 ounces raspberries
1 1/2 teaspoons cornstarch
1. Puree raspberry and cornstarch in a blender. I just used a bag of frozen raspberries and put all of the contents in. If you don't have a blender, I think it would work if you just put the raspberry and cornstarch in a pot and mixed it as best as you can.
2. Place the puree in a pot. Make sure that there's at least 1-2 inches of room in the pot, because the puree will sputter a bit. Heat the puree on medium heat. When it started to boil, I was scared of stuff spewing out, so I stirred it often. Heat for about 8 minutes or until the mixture has thickened. I judged the thickness by looking at the spatula. It will coat the spatula (or spoon, or whatever you have) and slowly drip off, but not completely.
3. I would preheat the oven to 350 sometime about now. Place the puree in a strainer and place a bowl underneath it. When I was straining the puree, I had to use the spatula to press the puree through the strainer.
4. Combine the crust ingredients: graham cracker crumbs, butter, and sugar. I used a box of graham cracker crumbs, but you could always break the crackers up yourself. Or, you can experiment with different cookies, like nilla wafers or oreos...yum. I put them straight into my springform pan, which is a pan with a separable base and rim. It's convenient, but you could use a round pan that is two inches high instead. You could use a rectangular pan, but you might need to double the recipe.
5. Mix the ingredients with your hand and press it against the pan. Make it however you prefer. I actually doubled the original amount of crust, so if you aren't a huge fan of crust, reduce the amount of ingredients for the crust by half. You can make the crust climb up to the sides of the cheesecake, but you don't have to.
6. Bake at 350 for 15 minutes. After you take the crust out, you can reduce the heat of the oven to 300. I also place a glass pan of water in the oven to create steam. The steam helps keep the surface of the cheesecake from cracking. If you are using a pan to hold your cheesecake, you can use a water bath. The hot water helps the cheesecake bake evenly. I can't use a water bath because of the springform pan...the water would leak into the cheesecake. I know Rachel doesn't do the water thing, and her cheesecakes turn out great so I guess it's optional.
7. Combine the cream cheese, sugar, and vanilla in a large mixing bowl. I like to use a large bowl to make sure that I have a lot of splash room. Make sure that the cream cheese is soft. You can either leave it out at room temperature 30-60 minutes before you start, or you can microwave it. If the cream cheese is too cold, it won't mix well. I used an electric hand mixer, but you could also use a blender (Lionel does that) or manually.
Oh and another thing: my cheesecake is short. The original recipe called for 32 ounces of cream cheese and three eggs, but I only used 16 ounces and 2 eggs, keeping everything else the same. If you want a taller cheesecake, just add those back in.
8. After the sugar has been incorporated with the cream cheese, add one egg. Mix until it is mostly combined, then add the next egg. If there are little lumps in the batter, that's okay. You don't want to overmix the batter because it can result in a grainy cheesecake.
9. Okay, ready for assembly. Pour half of the cheesecake batter into the crust.
10. Spoon half of the puree on top of the cheesecake batter.
11. Pour the rest of the cheesecake batter into the crust.
12. Spoon the remaining puree onto the cheesecake. Lionel had fun with this and made a face. Can you see it?
13. Next, you swirl the puree. Using a butter knife, make vertical serpentine movements. Insert the butter knife all the way through the batter. I hope that makes sense >.<
Making the first stroke
Completing the vertical movements.
14. Lift up the knife and then make horizontal serpentine strokes into the batter.
15. Taa-daa! Bake at 300 for 50-60 minutes until the cheesecake is set. The surface of the cheesecake will be dry. When you jiggle the pan, the center of the cheesecake (about 1 1/2 inch diameter circle) will jiggle. I kept the oven door ajar for 10 minutes before I took the cheesecake out of the oven. Then, let the cheesecake cool completely before placing it in the fridge. When it's chilled, it's ready to serve!
There you go everybody! I hope that didn't seem too complicated. It took us about an hour and 45 minutes to make and bake the cheesecake. It tasted really great.
Thursday, August 20, 2009
Bomb Diggity Spaghetti
So for our first recipe we are going to have a spaghetti sauce that Rachel just made up for her and Chris' first dinner with friends on Wednesday night. It was something simple that she figured could be Lien's first attempt at cooking. However, little to her knowledge it ended up turning out better than any other spaghetti sauce she has ever made so bear with her as she tries to remember exactly what she did.
Btw, pictures will be coming soon. The camera is charging right now otherwise they would be in this post now.
Anyways, here we go:
Bomb Diggity Spaghetti:
1/4 cup olive oil
1 tablespoon of minced garlic (conversely about 8 cloves of garlic minced)
1 yellow onion chopped
1 cup chopped carrots (so about 2-3 large carrots or a cup of baby carrots)
44 oz. tomato sauce (cans)
1 tablespoon of oregano
2 bay leaves
1 teaspoon of parsely
1 1/2 teaspoons of chili flakes (if you really don't want spice only add 1/2 teaspoon, but Lien it is necessary for the flavor!)
1/2 teaspoon of salt (TASTE first before adding this. Depending on your taste you might not want it)
1 tablespoon of brown sugar packed (this means you smush as much brown sugar in that measuring spoon as you can)
1 lb of ground turkey meat (ground beef or pork is just as fine)
1 lb of spaghetti
makes about 8-10 servings
Take out your largest pot, at least 8 qts. Put it on the stove and place it on medium-low heat. Pour in olive oil and minced garlic. To mince the garlic (do this before turning on the stove) take one clove at a time and then chop it into small slices. Then continue slicing it until it is as small as you would like it. For flavor's sake your spaghetti will taste more like garlic the smaller you make the garlic. If you like chunks of garlic that is fine too.
Once the garlic and the olive oil are warming in the pot, chop the onion and carrots. Do not do this before because then you will allow the garlic time to infuse with the olive oil while you chop the onions and carrots. To chop an onion, chop off about 1/4 inch of the top and bottem. Then peel the skin off (the brown part). Then chop in half length-wise. Cut each half one at a time. Place your hands on the top and bottom of the half, with the middle flat side on the cutting board. Then with a smaller knife slice the onion width wise under your other hand that is holding the top and bottom together. Rotate the onion 1/4 so that way the top/bottom is facing you while you are still holding all these slices together. Then very carefully cut length-wise, which should then result in a diced onion. Conversely you can take each individual slice and cut it length wise so you get diced onion. (Or you can ask your roommate to show you!) For the carrot if using baby carrots just slice them width wise into about 1/4 inch slices. Do that till you have 1 cup of carrots. Otherwise if you have large carrots, then similarly slice the bottom until you start getting to the thicker part of the carrot (where it is over 1/2 inch wide). With this thicker part, cut the carrot in half length wise, and then in half again length wise, so you end up with it in quarters. The continue slicing it into 1/4 inch thick slices.
Once you are done chopping the onions and carrots place them in the pot with your olive oil and garlic. Stir your ingredients to coat the veggies in the olive oil. Then cover the pot, turn up the heat to medium, and let the veggies cook for about 7-9 minutes, stirring occasionally, until the onion is no longer opaque, and beginning to get transparent (but not completely clear). Then add the tomato sauce and stir. Then add all of the seasoning (including the sugar). Allow the sauce to simmer (so just slowly bubble, on medium low or low depending on the strength of your stove), for 5 minutes to allow the flavors to start to mingle. Then taste and add some more seasoning if you wish. Then add the ground meat, and chop to your desired piece size. The longer you cook the sauce the more fragile the meat will get and thus it will become more of a ragu rather than "meatball"-like.
After you add the meat you just need to cook the sauce for another 15 minutes on medium low heat. Then reduce to low heat and cook for as long as you want. The longer you cook the sauce the more flavor it will have. I cooked mine for about 3 and 1/2 hours the other night, but I have also made spaghetti before in under 1 hour, so it is really up to you. Just need to most importantly make sure the meat is cooked.
In the mean time you can boil a pot of water. For this amount of pasta listed, you will need another pot of comparable size. For the amount of pasta you will eat at once Lien, you can use a smaller pot and only about a little over a quarter's size in diameter of pasta. Main thing is to fill your pot 3/4 of the way with water so you don't put too little in. Then bring the water to a boil. Break the spaghetti in half so it fits in the pot and you don't have to push it into the water (thereby avoiding burns). Then read the instructions on your speghetti packet for how long it needs to cook. Angel hair pasta is about 4 minutes, sometimes 3 if you want it al dente (a little chewy), whereas spaghetti normally takes about 8-11 minutes depending on its thickness. Then strain your pasta in the sink. Place in serving bowls and then with some spaghetti sauce on top and serve.
If you are not combining the spaghetti with the sauce immediately, add about 1 tablespoon of olive oil to it and stir it to coat the noodles. This will prevent them from sticking together.
Let me know if you have questions still,
Rachel
Subscribe to:
Posts (Atom)