Here is my mom's recipe for cassava cake. It is gooey, coconut-y and good. Cassava is also known as yucca.
Cassava Cake:
3 16-ounce bags of frozen, grated cassava. You could also buy fresh cassava and grate it yourself
3 eggs
1 12-ounce can evaporated milk (not condensed!!)
1 14-ounce can coconut milk (also advertised as coconut cream)
2 cups sugar (1 1/2 if you want it less sweet)
5 tablespoons cornstarch
3 drops yellow food coloring (optional)
Just mix everything together in a big bowl. Pour into a 13"x9" pan. Bake in a 350 degree oven uncovered for about 1 hour and 20 minutes. The bake time depends on what pan you use. If the batter pours out very shallow, it may finish baking in one hour. The top should start caramelizing and may be burnt a little bit, that's okay. Let it cool in the pan. Dig in and enjoy.
Variations: put strips of fresh coconut in the batter, pour caramel or dulce de leche on top.
Wednesday, August 3, 2011
Friday, July 22, 2011
Chicken Parmesan
While I was traveling in NY, I helped make dinner for me, my sisters, my friend Linh, and her friends. We made chicken parmesan with mozzarella sticks, green beans, and browned-butter pasta. We cooked for a big group of 8 and some left overs too.
Chicken Parmesan:
tomato sauce (you could use pre-made, canned sauce):
60 ounces tomato puree or sauce (doesn't have to be exactly 60 ounces)
1 1/2 onion (any type of onion, small sized)
3 cloves garlic
1 teaspoon salt
1 teaspoon pepper
6 teaspoons dried, crushed oregano
2 teaspoons dried, crushed basil (optional)
2 teaspoons sugar (optional)
6 chicken breasts, skinned, boneless
1 can Italian seasoned breadcrumbs
If you can't find any pre-seasoned breadcrumbs like us, use
12 ounces panko breadcrumbs or regular breadcrumbs
2 teaspoons salt
2 tablespoons garlic powder
2 teaspoons black pepper
5 tablespoons oregano
1 1/4 cup grated parmesan (leave some for topping the food)
5 cups all purpose flour
8 eggs
8 ounces mozzarella cheese, whole block or shredded
1. Chop the onions and cook them in some olive oil in a large pot.
3. Meanwhile, prep the chickens. For convenience, buy skinless, boneless chicken breasts. If you buy them with bones, you'll have to trim that. Trim off excess fat too. Cut each chicken breast in half. Place in a ziploc bag and thin them out to 1/3"-1/2". Use whatever you have to pound out the meat.
4. Set up your dipping stations. Place three shallow bowls in a line. The first bowl will have flour. The next will have beat eggs. The last bowl contains the breadcrumbs. If you didn't find a can of seasoned breadcrumbs, just mix plain breadcrumbs with the seasonings in my list. Fill the bowls about halfway. Don't fill the bowls too much or you will make a mess. You will probably have to refill the bowls later on.
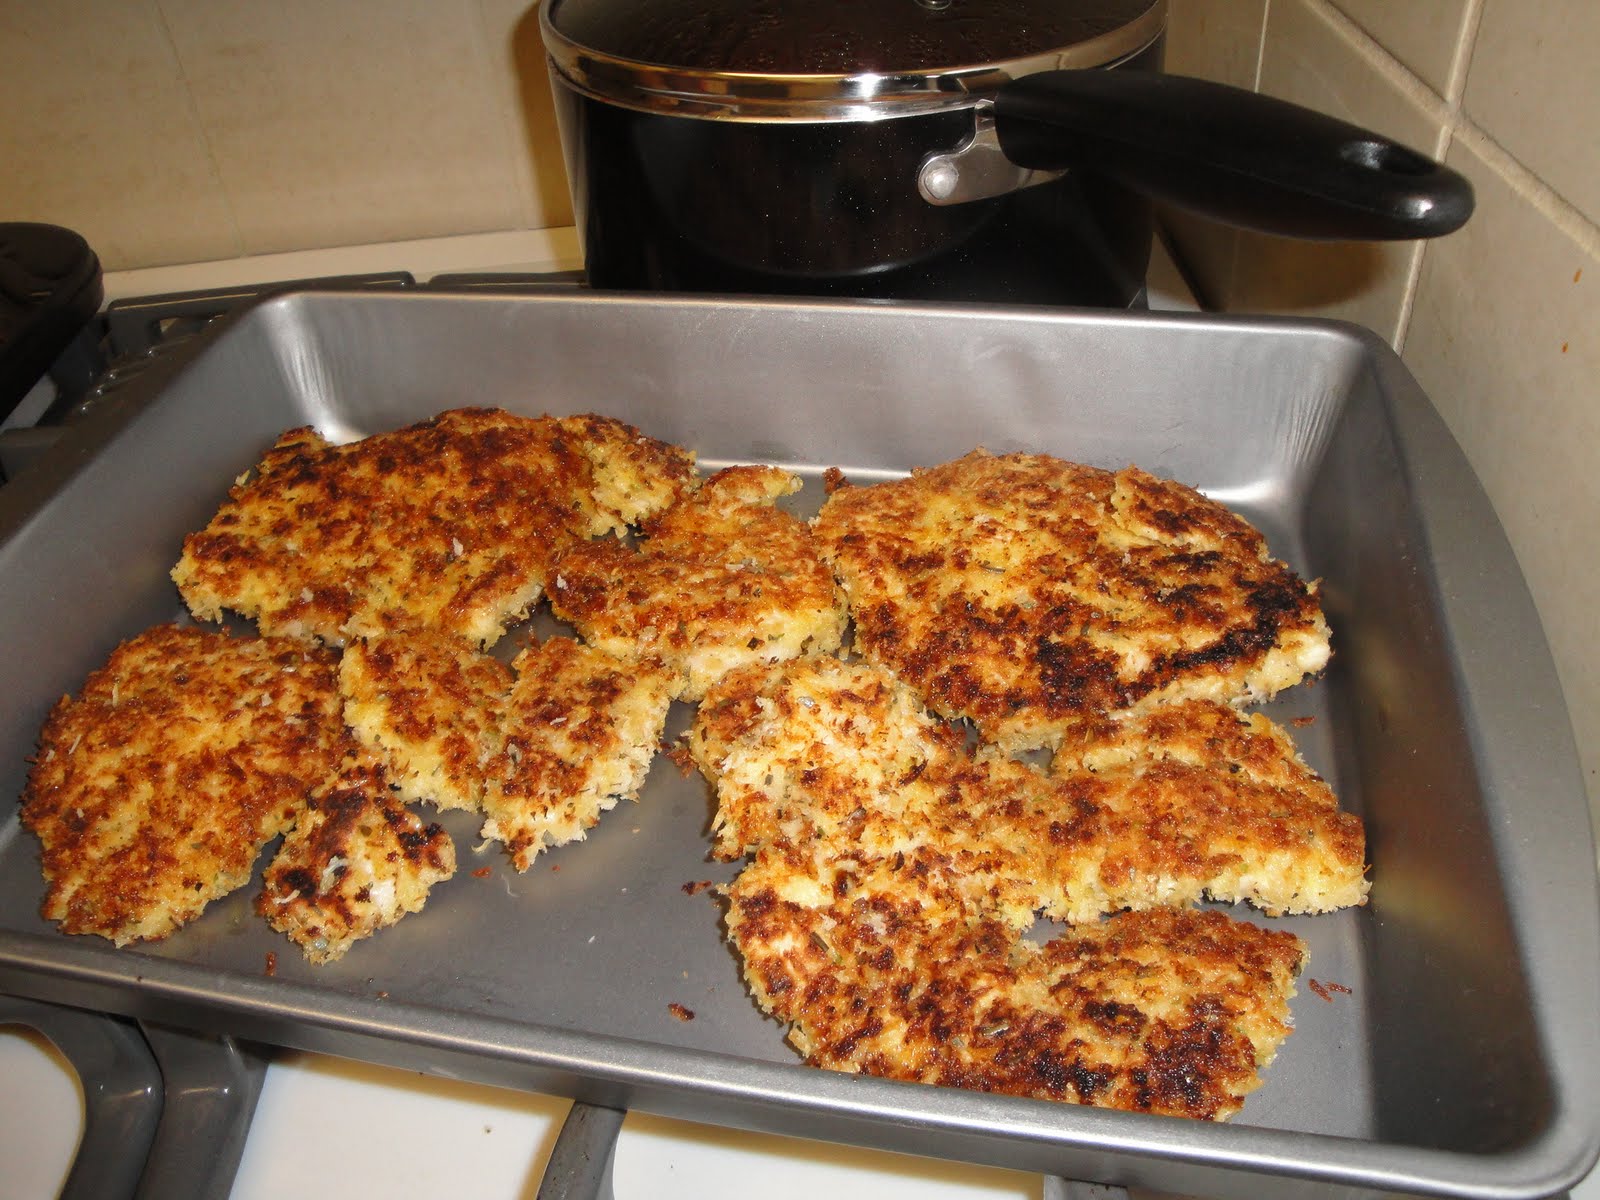
5. Heat a pan with some olive oil. To make things go along faster, you can set up multiple frying pans. Or you can put a griddle over two burners, like we did. Dip your chicken in the flour, shake off the excess flour, dip into the egg, and then dip into the breadcrumbs. Cook the chicken breasts on the stove until both sides are nice and browned. It'll take about 3-5 minutes per side. Don't worry about the chicken being cooked all the way through. When each piece of chicken finishes browning on both sides, place the pieces in a oven safe dish. Try not to overlap the chicken. When you are close to finishing, preheat the oven to 400F.
6. When the chicken is all browned, ladle the tomato sauce over the chicken. In my pictures, I have less sauce than what I wanted. The sauce will come up to the level of the chicken pieces. The mozzarella can be sliced as shown below or shredded. Bake the chicken uncovered for 25 minutes. Then, set the oven to broil and cook for 1-2 minutes. Be careful when broiling because the cheese can easily burn.
Hmm, we seem to have extra mozzarella. We bought two 8 ounce blocks. Why don't we cut the mozzarella into big chunks. Dip in flour-egg-breadcrumb-egg-breadcrumb. Fry on the stove on all four sides and finish them in the oven or toaster oven. Experimental mozzarella sticks!
Happy eatings.
Banana cranberry walnut bread
I love banana bread! Sorry I didn't take many pictures.
My version of banana bread:
2 cups chopped walnuts (pecans are a good substitute)
2 cups dried sweetened cranberries
2 cups boiling water
4 cups all purpose flour
2 teaspoons baking soda
2 teaspoons salt
1 1/2 sticks butter (12 tablespoons or 6 ounces), softened at room temperature
2 cups brown sugar
4 eggs
5 very very ripe bananas
1/2 cups plain yogurt (or flavored if you feel like it, sour cream would be good too)
1/4 cup vegetable oil (corn, canola, peanut, or a blend)
2 teaspoons vanilla
1. Chop the walnuts into small pieces, about 1/4 inch pieces. Toast in a dry pan on medium heat. Stir every 30 seconds or so. It should take about 3-4 minutes to toast. Find the largest piece and eat it. Is it crunchy now? Ok the nuts are done then. Immediately pour them into another container. Don't leave them in the pan or else they will burn. If your nuts are slightly burnt, it's okay, you can probably still use it.
2. Boil some water. Put the dried cranberries into a small bowl. Pour the water over the cranberries and let them soak. The level of the water should be 1/2 inch above the cranberries.
3. Place a strainer on top of a small bowl. Pour the flour, baking soda, salt into the strainer. Tap the side of the strainer until all of the ingredients are sifted through.
4. Place the softened butter and the brown sugar in a large mixing bowl. If the butter is not soft enough, microwave them for 10 seconds at a time till it's soft, then add to the bowl. Use an electric beater to beat the sugar and butter together for about 5 minutes. The butter should be fluffy and the sugar, completely mixed throughout.
5. Preheat the oven to 325 somewhere around here. Place the peeled bananas in a medium bowl. Use some implement to mash the bananas. I have a potato masher. A fork would also be acceptable. Add the oil, yogurt, vanilla extract and mix well. Add the eggs one at a time, mix well before adding the next egg.
6. Pour the banana mixture into the butter bowl. Electrically or manually mix. Add the dry ingredients a little bit at a time. Mix well before adding the next portion of flour. I poured in four additions.
Before adding the dry ingredients |
7. Stir up the water and cranberries in that forgotten bowl you have in the corner of the kitchen. Add the cranberries, walnuts, and cranberry water to the batter and mix well.
8. Pour into a greased 13"x9" pan. You could also use two loaf pans, or two smaller baking dishes, or many dozens of muffins/cupcake tins. When I bake in my 13"x9", it takes about 1 hour and 20 minutes to bake. Halfway through the baking, you can cover the bread with a piece of foil to prevent the top from browning too much. It will be done when you can start smelling the banana bread and a metal knife/fork comes out clean when you stab the middle of the bread.
Thursday, July 14, 2011
Red Wine Pasta Carbonara
I got this delicious pasta from Food and Wine, of course. Since I already loved carbonara finding a recipe that uses two of my favorite things, wine and procuitto/pancetta, seemed like a no brainer to try. I have been cooking it for a while now and just made it for my dad and brother this week. Needless to say I had to fight to have left-overs the next day for lunch! So now I have to post it so Josh can make it when he goes back to school.
Ingredients:
2 tablespoons of butter
2 tablespoons of olive oil
4 oz pancetta or procuitto cut into strips
1/4 cup of red wine
1 teaspoon of fresh ground pepper
1 teaspoon of fresh minced garlic
2 eggs
1/2 cup grated Parmesan cheese (I usually add nearly a cup though, we know how I love cheese)
1 lb of pasta
2 heads of broccoli cut into florets
1-2 teaspoons of olive oil
salt and pepper to taste
1. Preheat your oven to 450 for the broccoli and set a pot of water to boil for the pasta.
2. Put the butter and 2 tablespoons of olive oil in a skillet over medium heat. Cut the pancetta/procuitto and put it the skillet to cook until JUST crispy.
3. While the meat is cooking chop the broccoli and put in a pan. Drizzle with olive oil and season with salt and pepper. Then put in the oven to roast for about 15 minutes.
4. When the meat is just crispy add the wine, pepper, and garlic and cook until the wine has reduced to about 2 tablespoons. I don't always cook it that long, depends on how much "sauce" I want.
5. Make sure to add the pasta to the water when it is at a boil and check how long to cook it per its box. I use any and all pasta for the most part.
6. While the pasta cooks, add the eggs to your serving dish with the cheese. Scramble, or whisk it together.
7. Once the pasta is ready drain it and then immediately put in the serving dish and mix with the cheese mixture. This part is key to cook the egg in the pasta. Then add the broccoli and the procuitto/pancetta mixture. Grate more cheese to serve and enjoy!
Saturday, June 18, 2011
Roasted Garbanzo Beans
My mom told me about these babies as soon as I got home for break. I went "wait, you GRILL garbanzo beans? How do they not fall through the grill??" She laughed at me and said they used the roasting pan. I gave her a look and figured I would just have to wait and see. Two days after being home my mom decided she would make them, so she takes them out of the fridge and then puts them on a pan, and I ask, "what are those?" seeing these little pods, bigger than and squatter than edamame pods. She promptly replies, "these are the garbanzos!" At that point I was hooked.
Ingredients
1 lb of fresh garbanzo beans
1-2 tablespoons of roasted garlic olive oil
1/2 teaspoon of garlic salt
1/2 big lemon
any other fun stuff you want add for seasoning
1. Preheat the oven to 400 degrees.
2. While the oven is preheating, drizzle the olive oil over the garbanzos and sprinkle the salt. Mix them up and stick them in the oven.
3. Let them cook for about 20 minutes or until they are the desired brownness. My mom turns them if they cook them on the grill and then do it in a little pan with holes in the bottom. They also cook them for less time.
4. After they look good, take them out and sprinkle lemon juice all over them and season to taste.
5. Eat and enjoy! (Lien, don't eat the outsides :) )
So very addicting.
Fava Beans
This will be short and sweet since they don't take much to make, just lots of time and effort, and sadly I have no pictures.
For fava beans my parents go to our local farmers market and buy a whole big bag of them. At least 2 lbs usually since you buy them in the pods still.
You take your fava beans home, shuck them, as in break the pods and take out all the beans. This doesn't take too long. I watched Law and Order CI with my mom while my dad and I did it in about 15-20 minutes.
Wash all the beans at this point.
Take the beans and stick them in a pot covered in water. Bring them to a boil and let them boil for 2 minutes.
The next part is the evil part. I would highly suggest doing this part with a friend because it took me about an hour and a half to do it for all the beans. The next step is to take the 2nd shell off the beans. It kind of feels like a lima bean at this point but you take that part off and then it is like a cross between a garbanzo bean and a edemame.
Once your done though you can eat them! Or you can cook with them. My mom likes to saute them with preserved lemons, olives and bread crumbs, or toss them in a salad. They are delicious plain and taste kind of like a more buttery version of edemame.
Thursday, June 9, 2011
Home-Made Pickles
And now for the infamous pickle recipe from my dad. I swear every time I come home I always ask if he can make pickles two weeks before. Ashlee and I can practically eat a whole jar in one sitting....though as Adi shared with us last Friday that is not a smart thing to do. The pickles since my dad started making them have become quite well known. It is the only my dad ever posts on his Facebook for one, meaning all his family is jealous. Then whenever anyone comes to our house and asks for a pickle or has a sandwich/burger, or even just wants a snack, I am always quick to reply they have to have a pickle. Hey, Ashlee and I did use to eat pickles on a regular basis when we were little kids, so it's not THAT strange. Now I believe the pickles have traveled to the west to Navado with my dad's friend Kirk, and to the east to Fernley, NV with my cousin Shane's family. There is even a funny story about my dad getting a "Jesus with a Pickle" thank you card from our family friends the Malkiewiczs...even though it is really a renaissance woman with a pickle in her hand. He was so horrified Karen Malkiewicz searched far and low for a rabbi holding a pickle to appease my father.
anyways, here is the recipe, though I have yet to make them on my own. My dad is pretty pro and knows exactly what proportions to do for every size batch, so I think it takes a little more practice than just making it from the recipe.
Ingredients: For 6 jars of pickles
36 pickling cucumbers (my dad uses the smaller ones that are about 3-4 inches long
7 1/2 cups water
5 cups vinegar
1/3 cup salt
1 bunch of dill
1 teaspoon mustard seeds
2 teaspoons coriander seeds
3/4 teaspoon dill seeds
a head of garlic cloves peeled
1-2 onions sliced thinly...about 1/4 inch thick
good size handful of thai chiles
1. While preparing the pickles you have to sterilize the jars in boiling water.
2. Prep the pickles, by placing them in the jars. This is to make sure you have enough pickles to fill 6 jars, otherwise you need to alter your recipe. My dad usually has about 4 pickles in the bottom of the jar and then 2-3 pickles sticking out of the top a bit.
3. Prep your garlic and your chiles. We freeze our chiles as you can see.
4. Put the water, vinegar, and salt together to sit while you slice the pickles. Also add the dry spices.
6. Get your sterilized jars ready to the side. Put onions on the bottom of each jar, and then start filling your jars with pickles. Make sure you take the dill and add it in as you as pickles since you dont want it all at the top. Once full of each pile of pickles add onions and chiles and garlic to stuff full.
Next to come FAVA BEANS....which took two hours to prep...>_<
anyways, here is the recipe, though I have yet to make them on my own. My dad is pretty pro and knows exactly what proportions to do for every size batch, so I think it takes a little more practice than just making it from the recipe.
Ingredients: For 6 jars of pickles
36 pickling cucumbers (my dad uses the smaller ones that are about 3-4 inches long
7 1/2 cups water
5 cups vinegar
1/3 cup salt
1 bunch of dill
1 teaspoon mustard seeds
2 teaspoons coriander seeds
3/4 teaspoon dill seeds
a head of garlic cloves peeled
1-2 onions sliced thinly...about 1/4 inch thick
good size handful of thai chiles
1. While preparing the pickles you have to sterilize the jars in boiling water.
2. Prep the pickles, by placing them in the jars. This is to make sure you have enough pickles to fill 6 jars, otherwise you need to alter your recipe. My dad usually has about 4 pickles in the bottom of the jar and then 2-3 pickles sticking out of the top a bit.
3. Prep your garlic and your chiles. We freeze our chiles as you can see.
4. Put the water, vinegar, and salt together to sit while you slice the pickles. Also add the dry spices.
5. Start slicing your pickles, but make sure to keep them in piles by their jars so you know about how much you have per jar. My dad slices his pickles by taking about a dime size piece off the ends of each pickle and then slicing them in quarters, lengthwise. He always follows the grain of the pickle, curving down the middle if it curves. I was not very good at that part sadly...
7. Then add the pickle juice equitably among the jars. Tightly seal and let them sit in the fridge for about two weeks. Enjoy! :)
Subscribe to:
Posts (Atom)